Do you want to change the refresh rate of your monitor via the AMD Radeon Settings? This will be applicable to you if you are an AMD GPU user. If your monitor supports variable refresh rates by default, you can follow some simple steps to change the refresh rate of your monitor.

And, if you are looking for tutorials on how you can customize your monitor’s refresh rate using the AMD Radeon Settings, this is the post for you. Here we will be covering all the processes in a step by step manner and with necessary screenshots. Thus, you can follow along without any difficulties.
So, let’s proceed…
How to Change the Refresh Rate Settings in AMD:
There are a number of methods you can use to change the refresh rate of your monitor if you are using an AMD GPU. All of these are very easy to do. We will describe all the tutorials one by one in the following section.
Remark: Typically, you will be able to lower the refresh rate of most monitors available in the market by default. However, to increase the refresh rate of a monitor, you will need to have monitors that support overclocking natively. Yet, you can try to overclock a monitor following these methods. But we don’t advise it as it might damage your monitor. So, do it at your own risk.
Method #1 Using the Display Settings in Windows:
As usual, you will be able to change the refresh rate of your monitor using the Windows Display settings options. So, you can try this method first as it doesn’t require any additional third-party software. Here’s how…
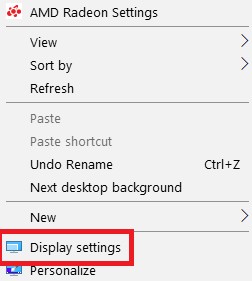
- First, right-click on the desktop of your PC and click on the ‘Display Settings’ option from the submenu

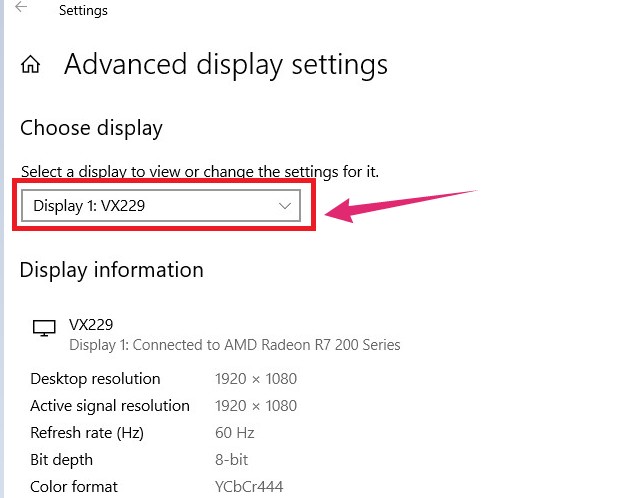
- Next, click on the ‘Advanced display settings’ option from the next page

- From the next page, you can first select the monitor of which you want to change the refresh rate. It will be applicable if you have multiple monitor setup

- Now, from the ‘Advanced display settings’ page, click on the ‘Display adapter properties for Display 1’ option

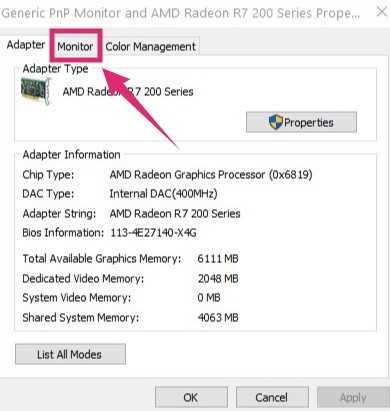
- In doing so, a new pop up window will open with all the settings related to your primary monitor

- From there click on the ‘Monitor’ option to access the ‘Monitor’ tab

- Now, from under the Monitor settings field, you will be able to change the refresh rate of your monitor. Just click on the dropdown menu and choose the screen refresh rate of your choice from the options

- To save the newly changed settings, click on the ‘Apply’ button from the bottom right corner of the popup window

Now, you know how to change the refresh rate of your monitor using the Windows default settings. However, now, we will be sharing how to change the refresh rate of your monitor using the AMD Radeon settings.
For your information, depending on the version of the AMD driver software you have installed on your PC, the process of changing the refresh rate will vary. Thus we will be sharing both of the methods in this post.
Method #2 Using the AMD Radeon Settings:
- At first, you have to right-click on the desktop in your PC and then click on the ‘AMD Radeon Settings’ options from the submenu

- Now, the ‘AMD Radeon Settings’ homepage will open. From there, click on the ‘Display’ button

- Next, click on the ‘+Create’ option from next to the ‘Custom Resolutions’ section

- In the next page, you will be able to change the refresh rate by clicking on the ‘Refresh Rate (Hz)’ option from the top

- After changing the refresh rate via the AMD Display Settings, click on the ‘Save’ options from the top right corner of the screen

Now, based upon the version of the AMD driver installed on your PC, you might not find the options described above. For those of you, you can follow the next method.
Method #3 Using the AMD Radeon Additional Settings:
- Again, right-click on the empty desktop window on your PC and click on the ‘AMD Radeon Settings’ option from the submenu

- Thus, the homepage of the ‘AMD Radeon Settings’ will appear. You have to click on the ‘Display’ button from there

- Now, from the next page, click on the ‘Additional Settings’ option from the top right corner of the screen

- In doing so, the ‘AMD Radeon Additional Settings’ will open up. Make sure, the ‘My Digital Flat-Panel’ option is selected on the left sidebar

- From the left sidebar, click on the ‘Custom Resolutions (Digital Flat-Panel)’ option

- Now, on the right side, you can actually set a new custom profile with customized refresh rates and other settings as well. So, click on the ‘New’ button from the right side

- If you are doing it for the first time, you will see a notification with some warnings appearing. So, click on the ‘Accept’ button from the bottom right corner of the screen

- Now, scroll down a bit and change the refresh rate from under the ‘Global’ section to your choice and click on the ‘Verify’ option

Now, remember, decreasing the refresh rate will not be an issue. In the process, your monitor might blink once. This is pretty normal. However if you are increasing the refresh rate, and if your monitor is not compatible with overclocking, then you might see that the monitor has gone black for a few seconds.
Also, you might notice a notification saying ‘Out of Range’ floating around the monitor. No need to be scared. It is usual and the monitor will come back to its default state automatically. However, it is also an indication that your monitor’s refresh rate can be increased.
Wrap Up – Customizing the Refresh Rate in AMD Radeon Settings:
We have covered all the various ways you can customize the refresh rate settings of your monitor. And, we have written this tutorial for the AMD GPU users, especially. At the same time, we also tried to make sure that the tutorials are easy to follow.
And always keep in mind that if you want to increase the refresh rate of your monitor, then make sure that the monitor is compatible with refresh rate overclocking. Otherwise, you might face various difficulties.
So, which monitor and GPU you use? You can tell us about your system in the comments below!