Looking to learn how to overlock 144Hz monitor? Well, look no further because in this guide we will explain just that. We decided to write about this topic as we noticed many people asking and trying to figure out if it can be done, and if so, how do you even do it, so without any further delay, let’s check out the guide itself.
All monitors come with a default refresh rate. We all know that the higher the refresh rate the better. Thus gamers and tech enthusiasts all around the world are on the look for a high refresh rate monitor. Now, you will be glad to know that there are a few ways you can actually overclock your monitor. Or simply put, you can increase the default refresh rate of your monitor even though your monitor manufacturer already sets a default value.
In this post, we will be showing you how to overclock your 144 Hz monitor with a few easy to follow step by step guides. And by following the tutorials below, you will be able to unlock a higher refresh rate on (almost) any monitors.
Disclaimer: Overclocking a monitor might impact your system negatively. In the worst-case scenario, your monitor or any other components on your PC might get damaged (permanently). So, follow the tutorials below at your own risk.
How to Overclock 144Hz Monitor Step-by-Step
There are several ways you can overclock a monitor. Especially, it depends on your Windows and GPU driver software. As a result, we will be sharing all the valid methods you can try to overclock your monitor. So, here we go…
Method #1 Using the Windows Display Settings:
There are many monitors that come with multiple refresh rate support. Also, some come with default overclocking support as well. In those instances, you can try to see if your monitor does support overclocking or not by going to the display settings. And, sometimes, some monitors can be overclocked if you decrease the resolution. Let’s see the step by step guide below…
Step #1 Change the Resolution:
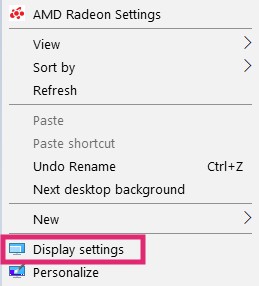
- Right-click on the desktop window of your PC
- Click on the ‘Display settings’ option from the popup menu
- Now select a lower resolution from the ‘Resolution’ selection dropdown menu. It is better to go with half the resolution of your native one
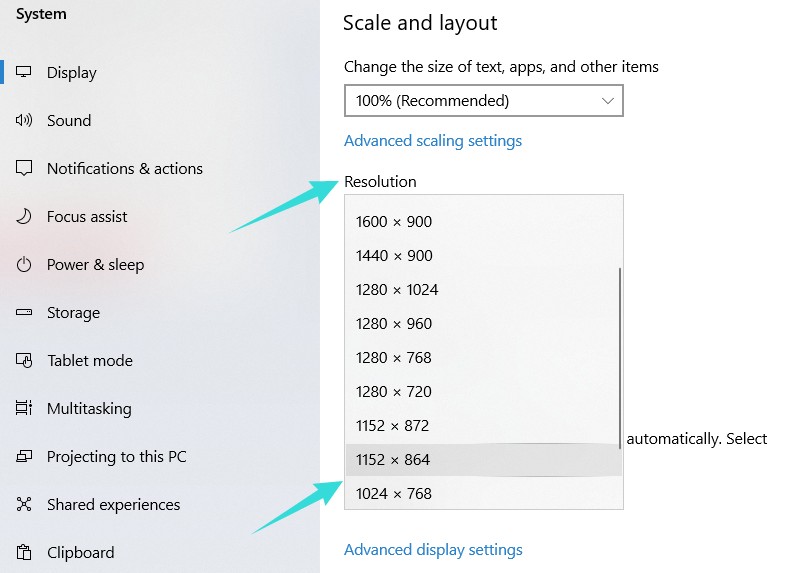
- Now, click on the ‘Keep Changes’ button from the notification that pops up
- In doing so, the screen resolution will change
Step #2 Change the Refresh Rate:
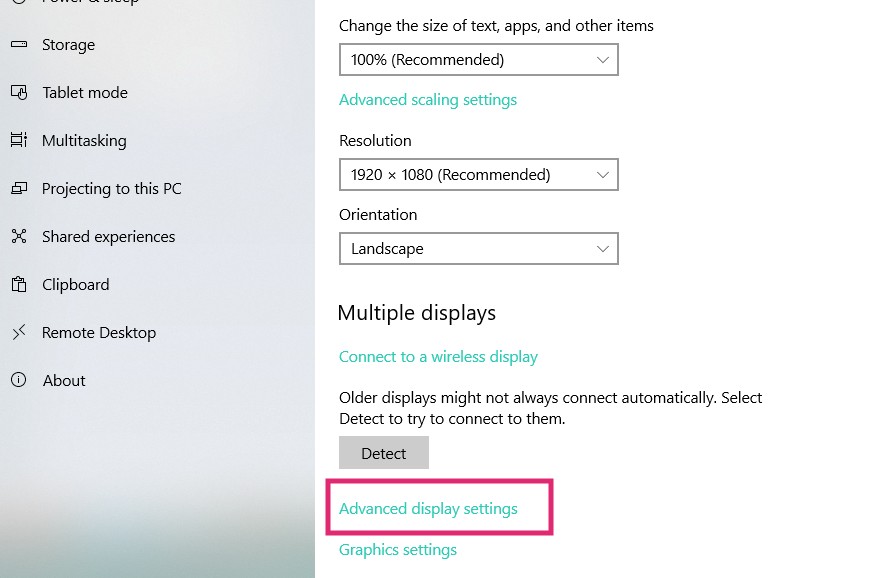
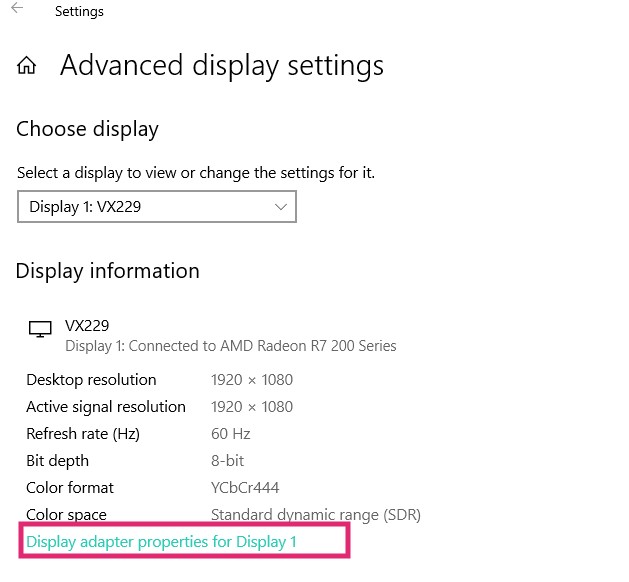
- Now, go to the ‘Advanced display settings’ option from the same ‘Display settings’ window
- From the next window, click on the ‘Display adapter properties for Display 1’
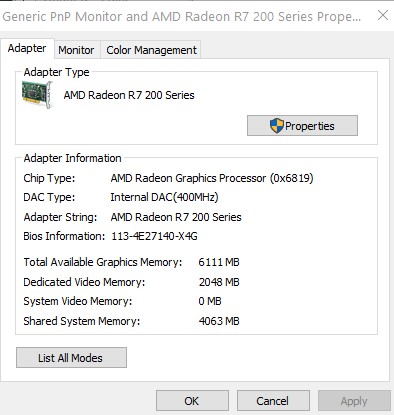
- Now, a new mini window will open up
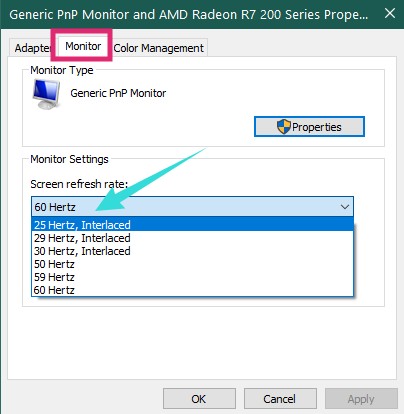
- Click on the ‘Monitor’ tab and select the new high refresh rate from the ‘Screen refresh rate:’ dropdown menu
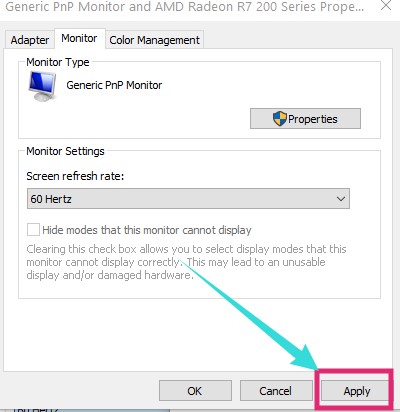
- Finally, click on the ‘Apply’ button from the bottom to save the changes
Now, if your monitor supports native overclocking, you can overclock your monitor by following Step #2 here. No need to lower the resolution at first. However, if your monitor doesn’t support overclocking by default, you can try both of the steps. Also, some monitors have the overclocking settings in the OSD menu. Thus, you have to access that by using the physical OSD buttons on your monitor.
Method #2 For AMD Radeon GPUs:
We are sharing this method particularly for the users of AMD GPUs. And depending on the version of the ‘AMD Radeon Settings’ program, the steps will vary. However, we will be covering all the variations here for you.
Step #1 Create a Custom Profile:
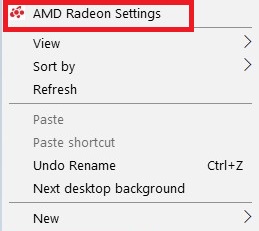
- Right-click on the desktop window of your PC
- Now, click on the ‘AMD Radeon Settings’ option from the pop-up menu
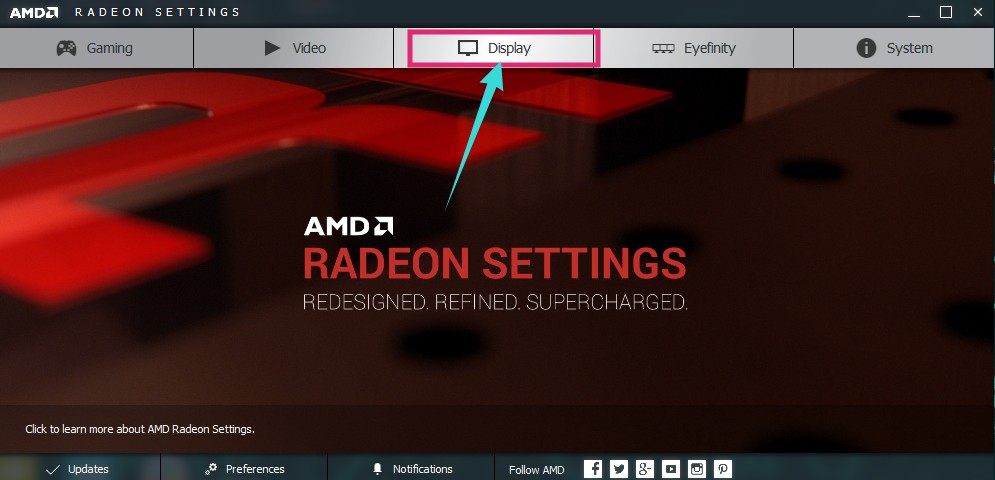
- Next, click on the ‘Display’ tab from the top menu
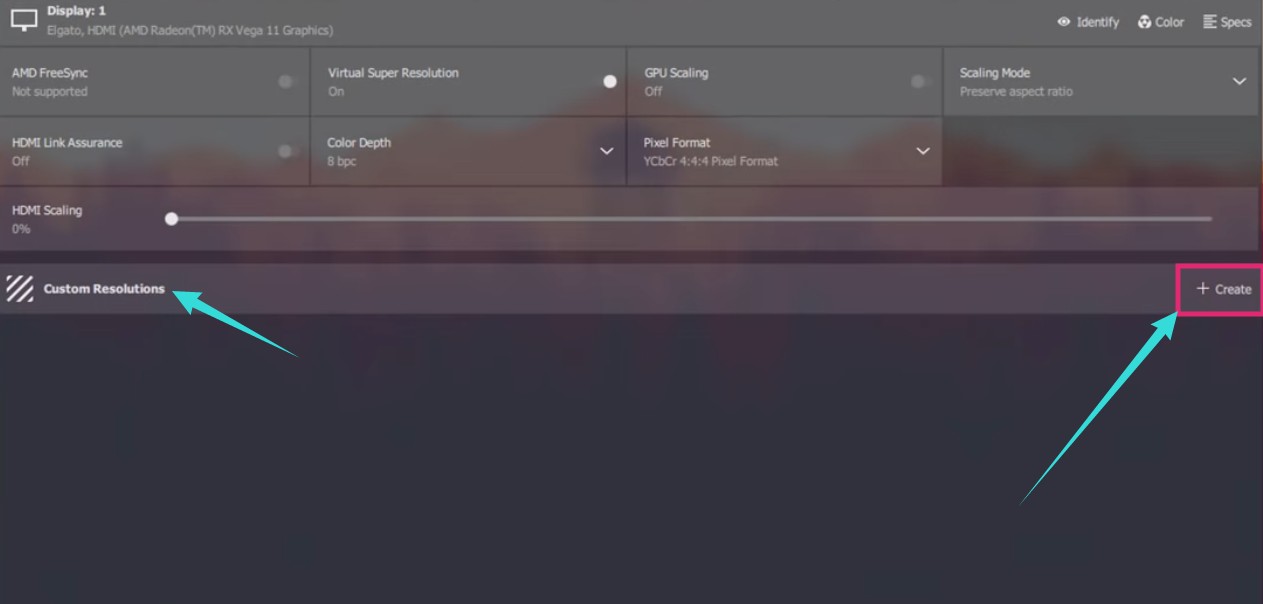
- Then, click on the ‘Create’ button from next to the option ‘Custom Resolutions’ from the new page
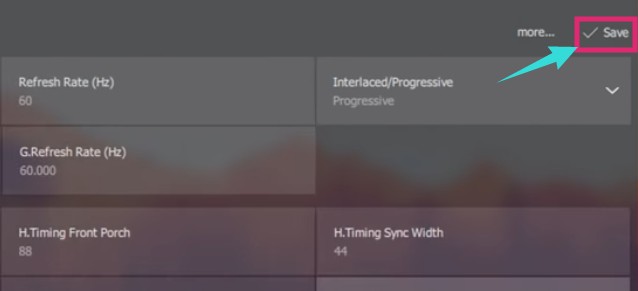
- From the next page, click on the ‘Refresh Rate (Hz)’ option and increase the refresh rate by 1 or 2 Hz higher at a time. Remember, don’t increase by a lot
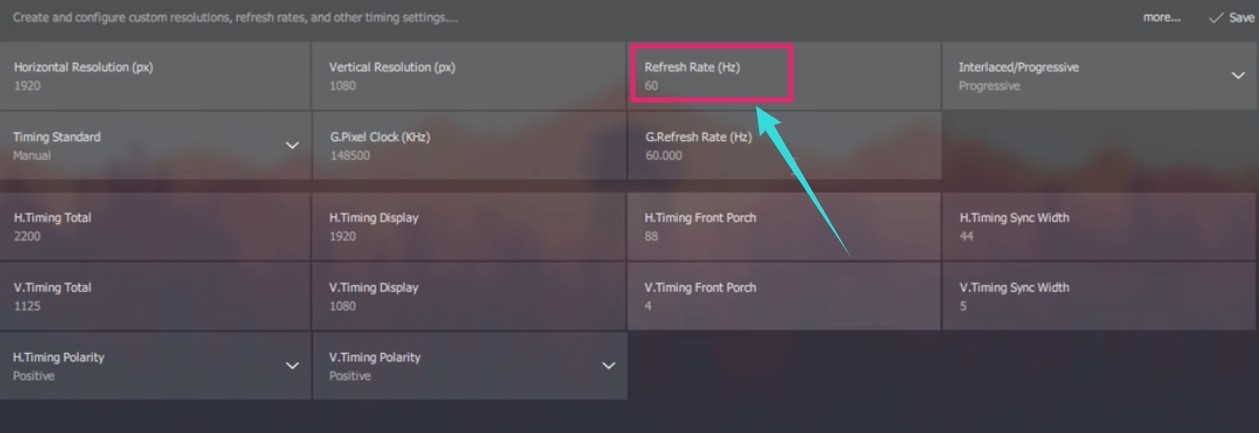
- Now, click on the ‘Save’ option from the top right corner of the screen
At this moment, you have set up a custom profile with a custom refresh rate. Now, you have to select the new refresh rate from the ‘Display settings’ of Windows. To do that you can follow the Step #2 of the Method #1. To be noted, if your PC can’t handle the new refresh rate, it will not be available on the dropdown menu. If that is the case, then you can follow the next methods.
Now, once you have selected the new refresh rate (if it is available), your monitor might blink. Added to that, if the new refresh rate can’t be handled by your monitor, it will go black for a few seconds. You might see the ‘Out of Range’ notification moving all around the screen. No need to worry, as your monitor will return to its previous state automatically after a few seconds.
Alternative Method for AMD GPU:
If the previous method doesn’t work for you or the version of the ‘AMD Radeon Settings’ software is different on your PC; you can try this alternative method. So, let’s go…
- Right-click on the desktop window of your PC
- Now, click on the ‘AMD Radeon Settings’ option from the pop-up menu
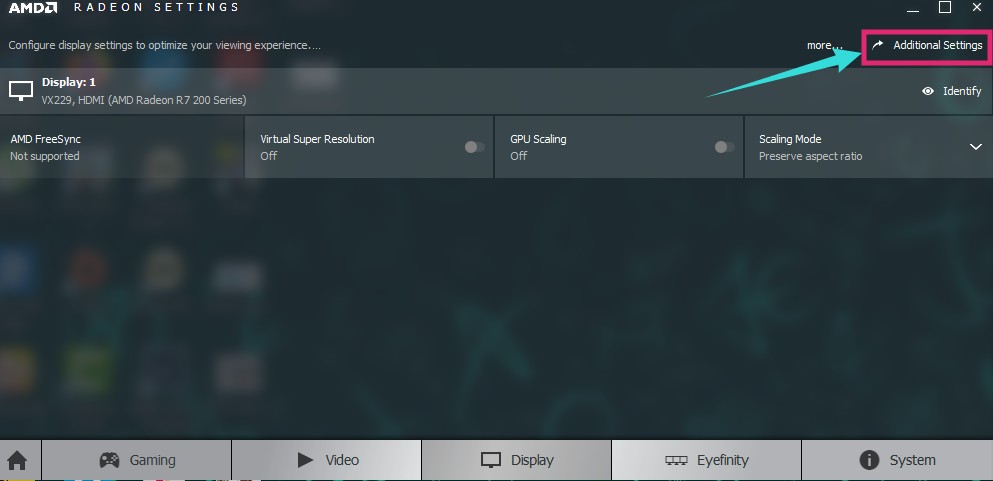
- Next, click on the ‘Display’ tab from the top menu
- Then, click on the ‘Additional Settings’ option from the top-right corner of the screen
- It will open the ‘Radeon Additional Settings’ In there, the ‘My Digital Flat-Panels’ menu will open by default
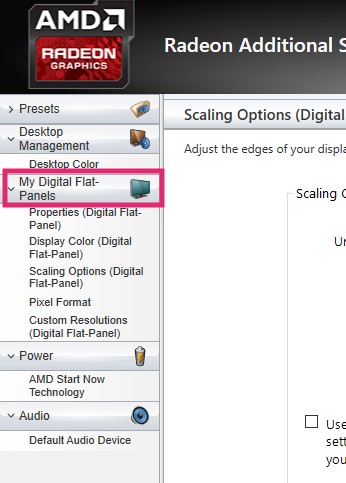
- Now, click on the ‘Custom Resolutions (Digital Flat-Panel)’ option from the left sidebar
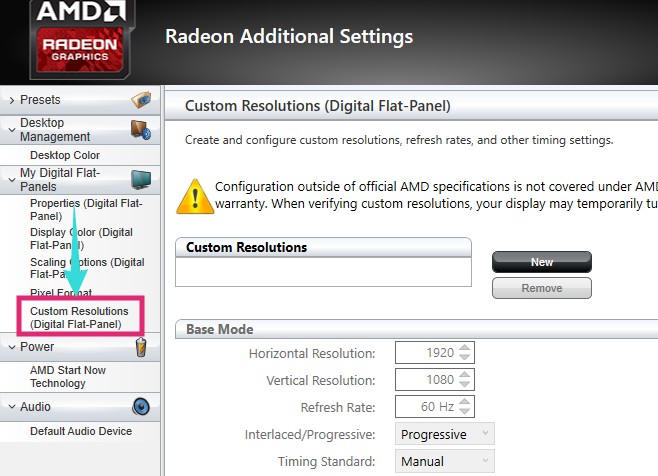
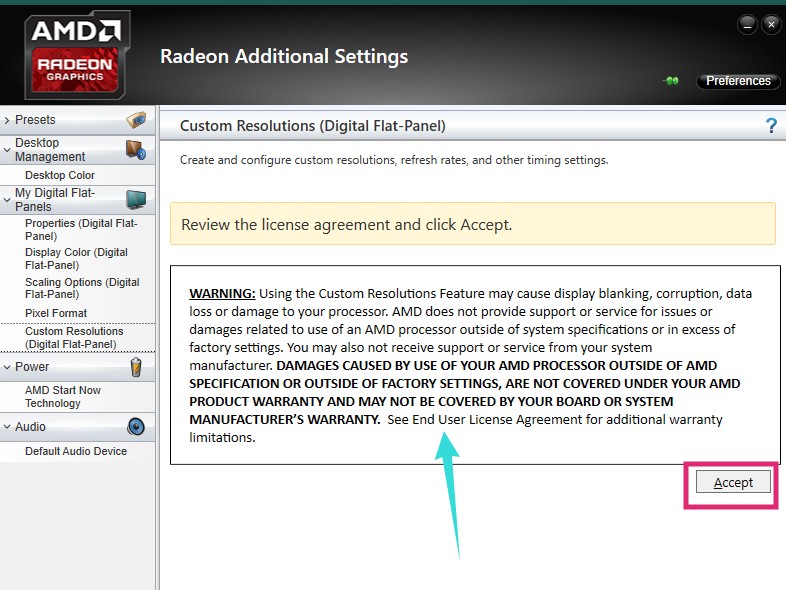
- From the main window, click on the ‘New’ button

- In doing so, a warning message will appear. Simply, click on the ‘Accept’ button from the bottom
- On the next page, you can set a new custom refresh rate for your monitor
- So, increase the refresh rate by 1 or 2 Hz at a time. Remember, don’t increase it by a lot at once. Here, it is better to increase the ‘Refresh Rate’ from under the ‘Global’ tab
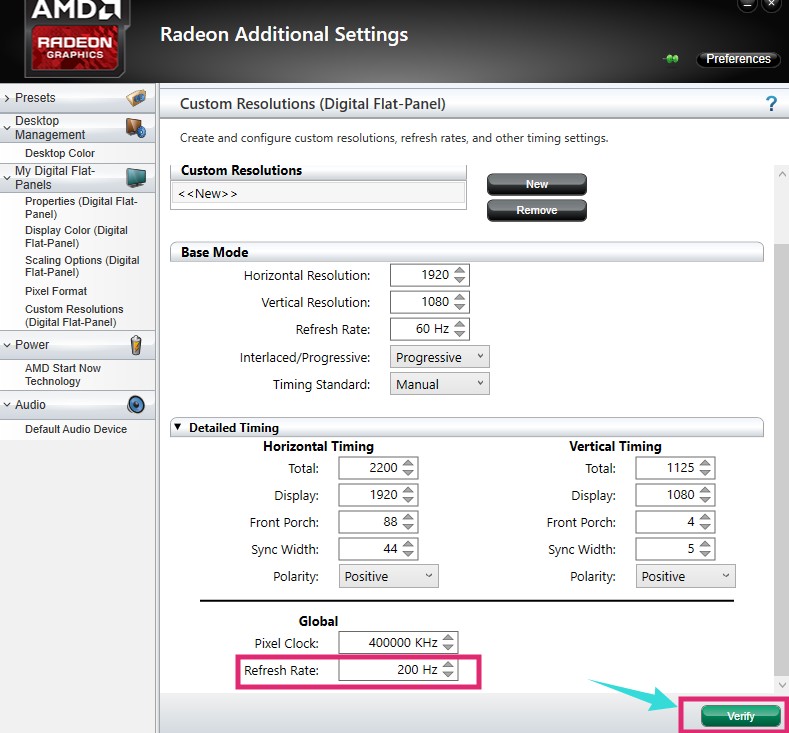
- After changing the refresh rate, click on the ‘Verify’ option from the bottom right corner of the screen
- In doing so, the new refresh rate will be verified
Your monitor might blink or go black in that instance. If the monitor goes black and says ‘Out of Range’, then you can’t overclock your monitor to the specified refresh rate you have just set. You can decrease that to see if this works.
For the record, if the new refresh rate is compatible with your monitor, it will not go black. In that case, it is referring to that it can handle the new refresh rate. So, next, you have to select the newly set refresh rate using the ‘Display settings’ as we have shown in the Step #2 of Method #1. With this step, your monitor will be overclocked.
Method #3 For NVIDIA GPUs:
This particular method is for NVIDIA GPU users. Here’s how to overclock your monitor if you have an NVIDIA GPU.
Before We Start:
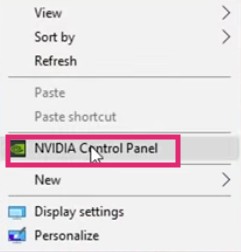
- Right-click on the desktop window of your PC
- Now, click on the ‘NVIDIA Control Panel’ option from the pop-up menu
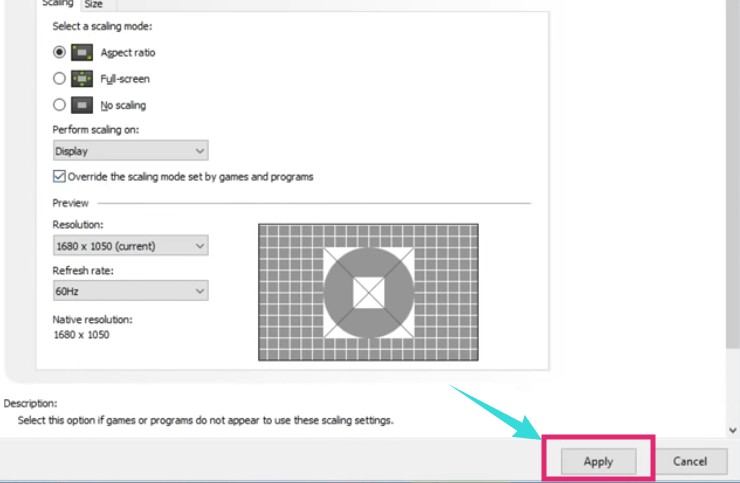
- And, click on the ‘Adjust desktop size and position’ option from the left sidebar
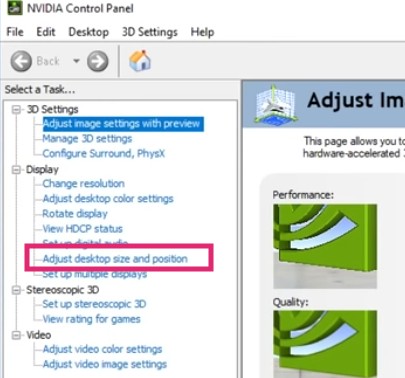
- Next, put a checkmark next to the ‘Override the scaling…programs’ option if you haven’t already
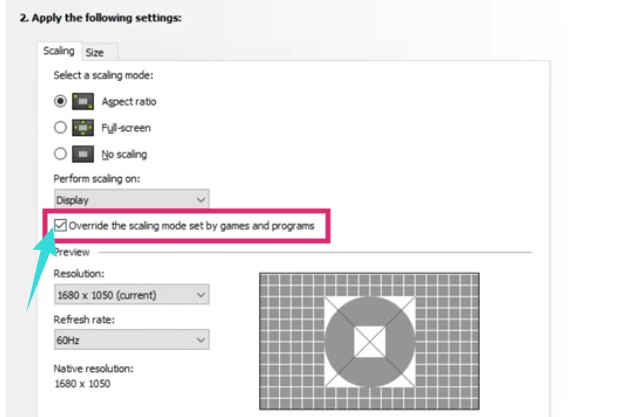
- Finally, click on the ‘Apply’ button to save the new settings
Steps to Follow:
- Right-click on the desktop window of your PC
- Now, click on the ‘NVIDIA Control Panel’ option from the pop-up menu
- Then, click on the ‘Change resolution’ option from the left sidebar
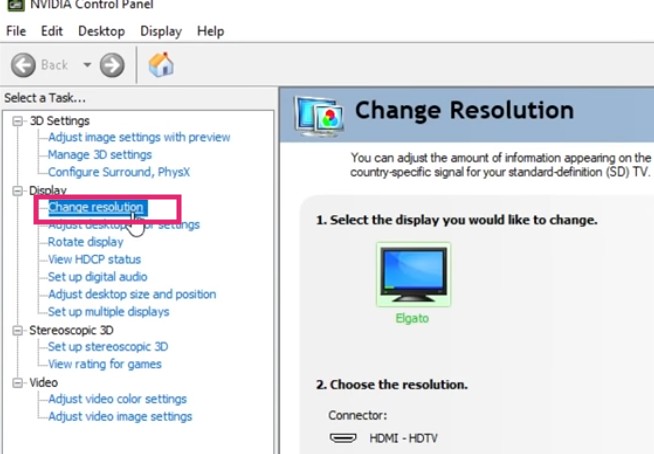
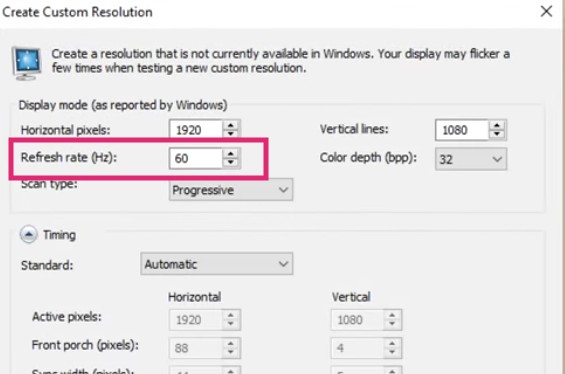
- Now, click on the ‘Customize…’ button from the main window
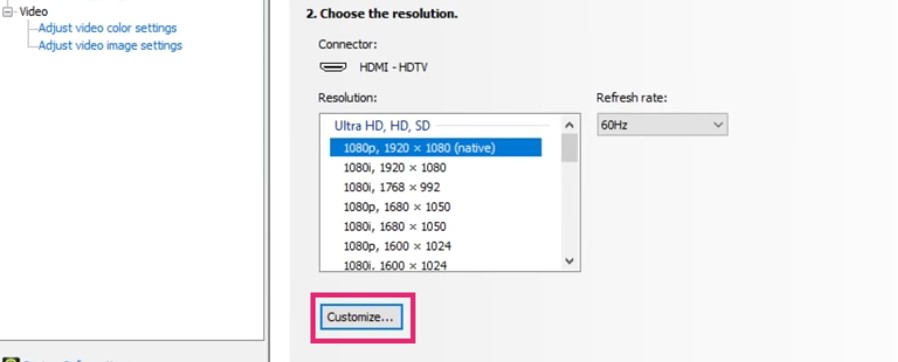
- From the next page, make sure that the ‘Enable resolutions not exposed by the display’ option is check marked. And, then click on the ‘Create Custom Resolution…’ option

- In doing so, a warning will appear. Simply, click on the ‘Accept’ button from there
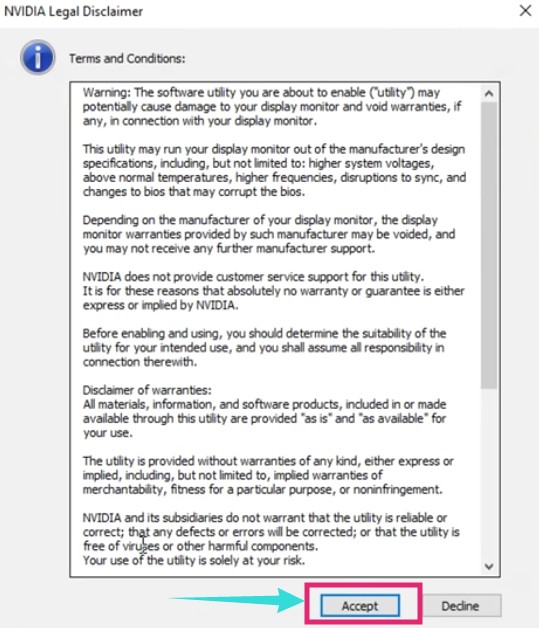
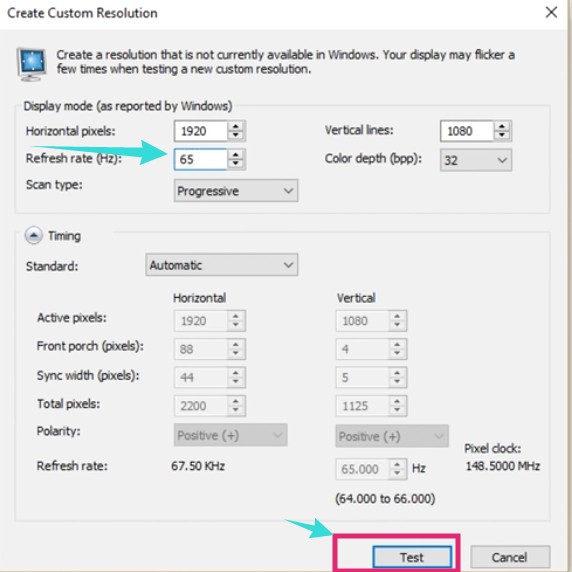
- Next, increase the refresh rate by 1 or 2 Hz at a time. Remember, don’t increase it by a lot at once
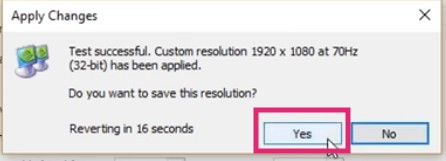
- After changing the refresh rate, click on the ‘Test’ button from the bottom
- A new popup will appear, click on the ‘Yes’ button to close that
- As a result, a new profile with the newly set refresh rate will appear under the ‘Resolutions’ menu
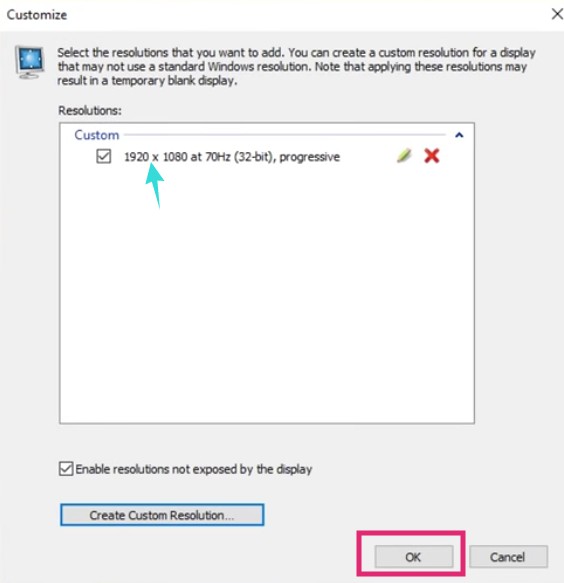
- Select that profile and click on the ‘OK’ button from the bottom right corner
- Now, select the newly set refresh rate from the dropdown menu named ‘Refresh rate:’
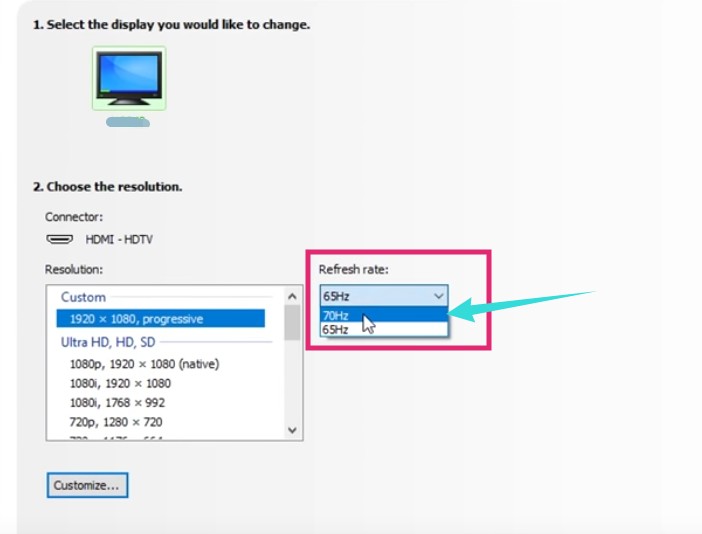
- And, click on the ‘Apply’ button

- Due to that another popup window will appear. Click on the ‘Yes’ button to close that
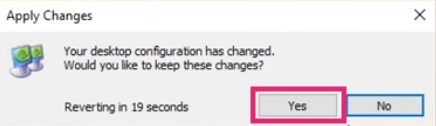
That is all you need to do to overclock your 144 Hz monitor if you are using an NVIDIA GPU. Once again, if the monitor goes blank or black, just wait for it to return to the default state. Also, later, you can manually change the refresh rate by following the Step #2 of Method #1 we have mentioned above.
Method #4 Using a third-party software:
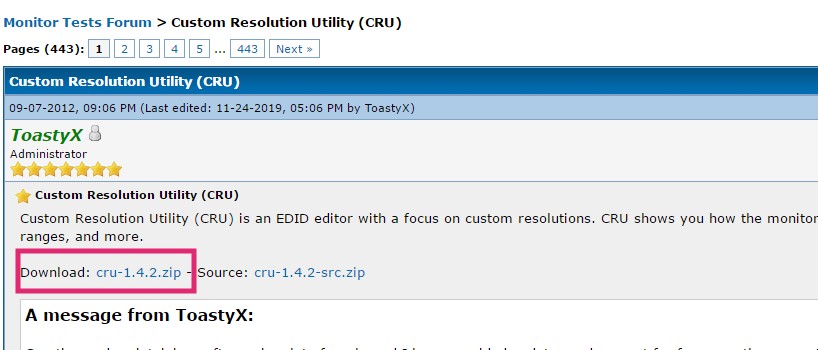
If you don’t have either an AMD or an NVIDIA GPU, you can use a third-party software to overclock your 144 Hz monitor. Here’s how to do that.
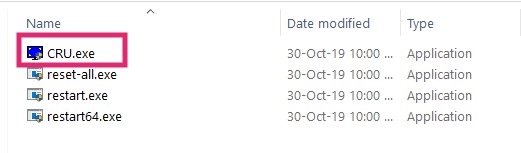
- Download the latest version of Custom Resolution Utility (CRU) and unzip it on your PC
- Now, run the ‘CRU.exe’ application
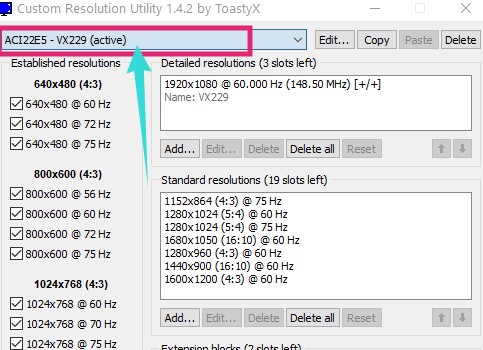
- Now, you can select the monitor you want to overclock from the dropdown menu on the top. It will be applicable if you are using a multi-monitor setup. Otherwise, the default monitor will be automatically selected
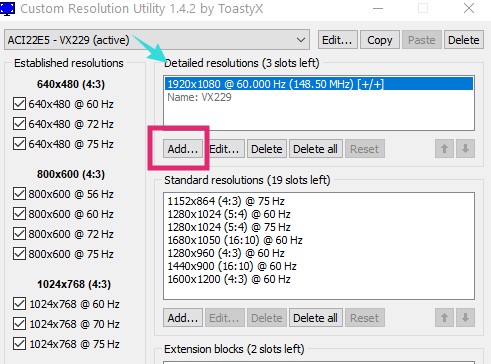
- Next, click on the ‘Add’ button from under the ‘Detailed resolutions’ tab
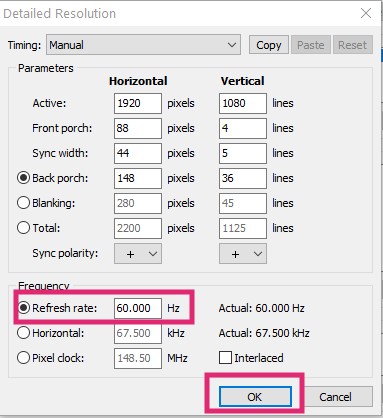
- From the newly opened popup window, you have to increase the refresh rate of your monitor. So, use the ‘Refresh rate:’ box and click on the ‘OK’ button once you have set up a new refresh rate
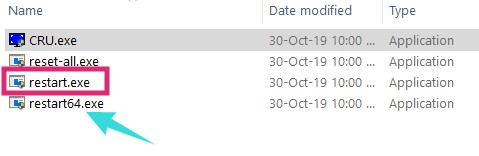
- Now, go back to the folder where you have unzipped the CRU utility earlier. And launch the ‘restart.exe’ program if you are using the 32-bit Or if you are using the 64-bit Windows then run the ‘restart64.exe’ program
- In doing so, your GPU will restart and if the new refresh rate is compatible with your monitor, it will be overclocked
Things to Know before Overclocking your Monitor
Till now, you have known how to overclock 144 Hz monitor or any monitor for that matter. But there are a few things you should be aware of prior to overclocking a monitor. So, let’s learn those things in the next section.
Might Void Warranty:
If you have read the above tutorials, you will know that every time you go to set a custom profile or a custom refresh rate, you will be shown a warning from your GPU manufacturer. In that warning message, it is clearly stated that there will be no warranty of any products if you damage them in the process of using custom settings like ‘custom resolution’ or ‘custom refresh rate.’ So, if your monitor doesn’t support overclocking by default, overclocking will surely void the warranty.
You might Damage your Monitor:
This is highly unlikely that your monitor will be damaged permanently while trying to overclock it. However, there are reports that a few monitors have been damaged permanently due to unofficial overclocking.
Frame Rate Drop/Screen Tearing Issue:
Let’s say, you have successfully overclocked your monitor, but that might not actually be beneficial for you. Because if your monitor is not capable of handling the new higher refresh rate by default, you might face frame rate drop/skip phenomenon. Also, if you play resource-hungry games on your PC, there will be frequent screen tearing issues. And, that is not great for enjoying seamless gaming.
Monitor’s Lifespan will Reduce:
Even if overclocking doesn’t damage your monitor permanently, reports say that overclocking will definitely reduce the lifespan of your monitor. So, if you think a mere 5-10 Hz increase in the refresh rate is ‘OK’ in exchange for a reduced lifespan of your monitor, you can overclock your 144 Hz monitor.
It might not be worth it:
Truth be told, if your monitor doesn’t support overclocking by default, then it might not be worth it at all. Because, manually, you can only increase the refresh rate from 5 to 10 Hz at best. And, in our opinion, that is not a significant difference at all. So, in most cases, overclocking a monitor that doesn’t support it officially will be pointless.
Our Last Words:
In this post, we have shown you different methods of overclocking monitors. Following the methods above, you will be able to overclock your monitor whether it comes with a default refresh rate of 60 Hz, 120 Hz or 144 Hz monitor. But always remember that try to increase the refresh rate by 1-2 Hz at a time. Otherwise, your monitor might not be able to handle the pressure. We hope this step by step tutorial on how to overclock 144 Hz monitor will help you in the long run.
So, will you try to overclock your monitor following the above guides? If so, you can share your experience with us in the comments section down below!