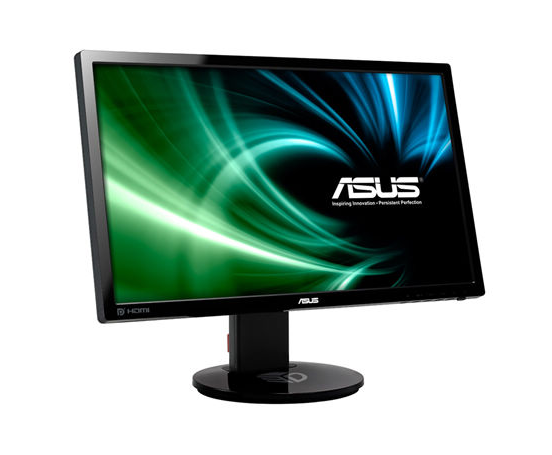
Asus VG248 is a great monitor. In fact, it is one of the cheapest affordable monitors in the market right now. This comes with a 24 inches display with WLED backlighting. It comes with a 1080p resolution. However, the best part about this monitor is its refresh rate and the response time.
It comes with 144 Hz refresh rate and only 1 ms response rate. This is very rare for a cheap monitor like this one. However, to minimize the cost, Asus has used a TN panel instead of an IPS/VA one. However, that is not a deal-breaker at all.
By default, the monitor produces high-quality image quality. However, what if you could improve it to a greater extent? Fortunately, you can tweak a few settings to make this great monitor even greater.
And, it is very simple to do. Thus, today’s article will be about sharing the best settings for Asus VG248 monitor. Additionally, we will also deliver some instructions on how to tweak the settings.
So, let’s proceed to the next section…
Best Settings for Asus VG248 monitor:
If you don’t know it yet, every display panel is different than the others. Even it is the same for the Asus VG248. So it is quite possible that our settings might not be suitable for your particular monitor.
Therefore, you might have to try out several different settings before getting the perfect one. And because of that, we will share multiple settings for you down below. So, let’s see…
Settings NO. 1:
- Splendid Mode: Theater
- Brightness: 36 (you can go for more if you prefer)
- Contrast: 61
- Sharpness: 49
- Saturation: 61
- Color Temp: Red: 98; Green: 97; Blue: 86 (User Mode)
- Smart View: Disable
- Skin Tone: Natural
- Trace Free: Lower than 60 is better
- ASCR: Off
Settings NO. 2:
- Splendid Mode: Standard
- Brightness: 64(you can go for more if you prefer)
- Contrast: 74
- Sharpness: 40
- Saturation: 55
- Color Temp: Red: 95; Green: 94; Blue: 88 (User Mode)
- Smart View: Disable
- Skin Tone: Natural
- Trace Free: 40 (Lower than 60 is better)
- ASCR: Off
No #3 Settings:
- Splendid Mode: Theater
- Brightness: 55(you can go for more if you prefer)
- Contrast: 44
- Sharpness: 40
- Saturation: 55
- Color Temp: Red: 100; Green: 96; Blue: 92 (User Mode)
- Smart View: Disable
- Skin Tone: Natural
- Trace Free: 55(Lower than 60 is better)
- ASCR: Off
Now, let’s try these settings one by one. And, try to find the best one for your display panel. Chances are, you might not find a single one suitable for you. So, what can you do in this instance?
Don’t panic! We have another workaround for you.
In situations like this, you can tweak the settings on your own to see what you like. In this following section, we will let you know how to do it. And we will share some more tips to get the best out of your Asus VG248 monitor.
So, let’s get there…
Breaking down the Preset Modes:
There are a number of default display settings in the Asus VG248 monitor. You may know them by ‘Asus Splendid Mode’. These are good if you want to change the viewing experience on the fly. You might like some of those presets. So, you should try them one by one.
But, not all of them are suitable for different activities whether it is for gaming, watching movies, browsing or editing. You can also customize those settings. So, before you use any one of those presets, let’s learn a little bit about them first. That way, you can take advantage of those settings.
- Scenery Mode:
You will notice the image quality is so bright and sharp. Also, a lot of saturation is noticeable. There’s a cold vibe going in there as well. You can change some OSD features which are Color Temp, Contrast, Brightness, Sharpness, Skin Tone, and ASCR from this preset.
- Standard Mode (144 Hz):
In this mode, you will see that the image quality is a little washed out with extra whites and depthless shades. There is also over-saturation. But, the shade crushing is decreased substantially. The extra OSD features you can tweak here are Contrast, Brightness, and Color Temp.
- Standard Mode (60 Hz):
This is a usable preset setting. Everything looks bright and rich using this one. The only problem is that you might not use this monitor at 60 Hz refresh rate whereas you can crank it up to 144 Hz. However, you can change the settings like Brightness, Contrast, and Color Temp in this mode.
- Theater Mode:
This is almost close to the ‘Scenery Mode’ preset. However, you will notice the shade crushing is a bit reduced here. The extra OSD options are Color Temp, Contrast, Brightness, Saturation, Sharpness, Skin Tone, and ASCR.
- Game Mode:
The Game Mode is close to the ‘Theater Mode’. The image quality is oversaturated and over sharpened. And, shade crushing is a bit reduced as well. You can change the settings like Color Temp, Contrast, Brightness, Saturation, Sharpness, Skin Tone, and ASCR.
- Night View Mode:
In this mode, the image looks soft but with over saturation, shade crushing, and beaching. The contrast is very low. Due to this, there’s no real difference between dark shades and blacks.
This is expected because this mode is for using in the dark environment. The changeable settings are Color Temp, Contrast, Brightness, Saturation, Sharpness, Skin Tone, and ASCR.
- sRGB Mode:
Frankly, this is one of the most balanced modes among all these modes. There’s minimum shade crushing and the white point is Okay. Yet, the brightness is on the high side.
But, that wouldn’t be a problem if you could tweak that. Yes, in this mode, you can’t change any one of the settings like brightness, contrast, sharpness etc.
So, you can see that even though these are great presets, they have their shortcomings as well. In a sense, these are not best for your monitor.
As a result, you have to tweak these preset settings to calibrate your monitor yourself. Or you can use the settings provided by us above.
Yet, there is another thing you can try. You can use some ICC profiles to your liking. Let’s learn about it down below.
What is ICC Profile?
Here, ICC stands for International Color Consortium. This is a technique to trick the GPU and monitor. Here’s how it’s done. After installing and activating an ICC profile, it will alter the LUT (Look Up Table) and the Gamma Table of the GPU you are using.
As a result, the monitor will produce different yet correct colors to its real-world counterpart.
Here are two ICC profiles for both AMD and NVidia GPU users exclusively for the Asus VG248 monitor. You can download them and install them on your PC by clicking on those links. All the instructions will be in the next section.
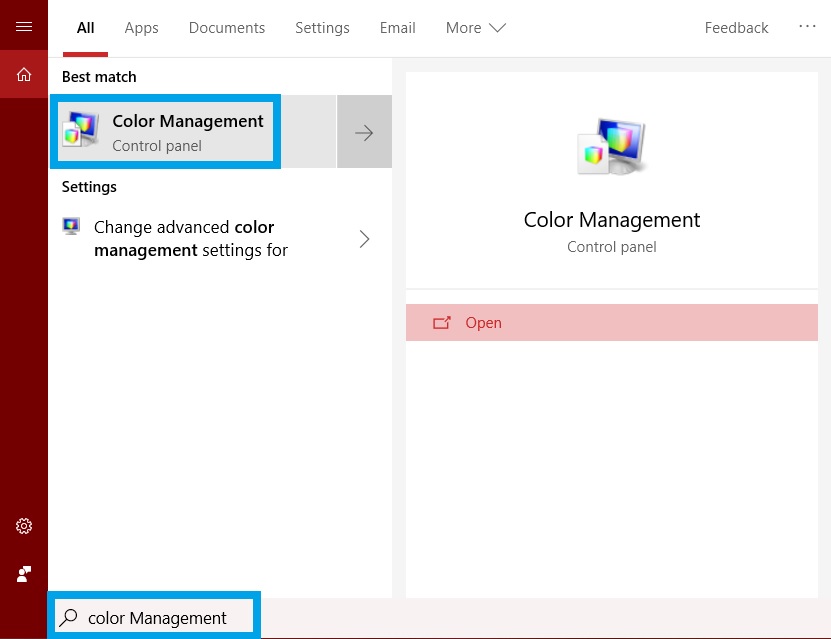
How to install and Activate ICC profile?
Here is a step by step guide for you.
Steps to follow:
- First, download the ICC profile based upon your GPU from the download links above
- Now, right-click on the ICC Profile file and click on the ‘Install Profile’ option from the sub-menu
- In doing so, it will be installed on your PC. Now, you can activate it following the steps below and use it
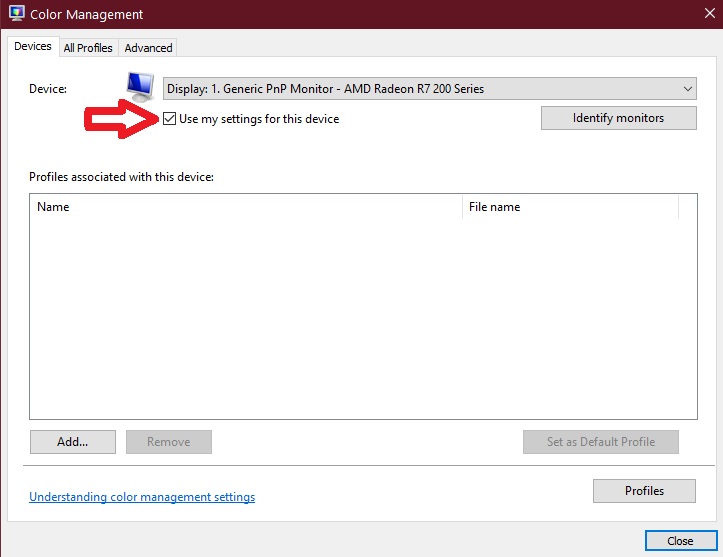
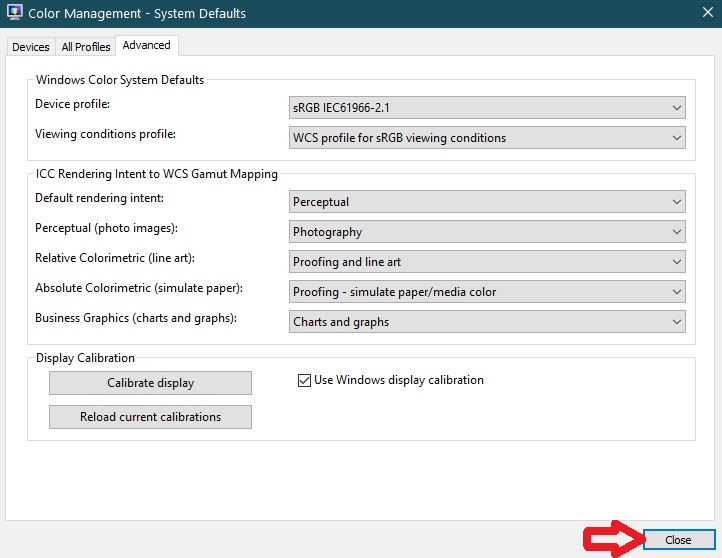
- Navigate to Control Panel> Appearance & Personalization>Display> Screen Resolution (For Windows 7) or search for ‘Color Management’ and open it (on Windows 10)
- Checkmark the box next to the option ‘Use my settings for this device’
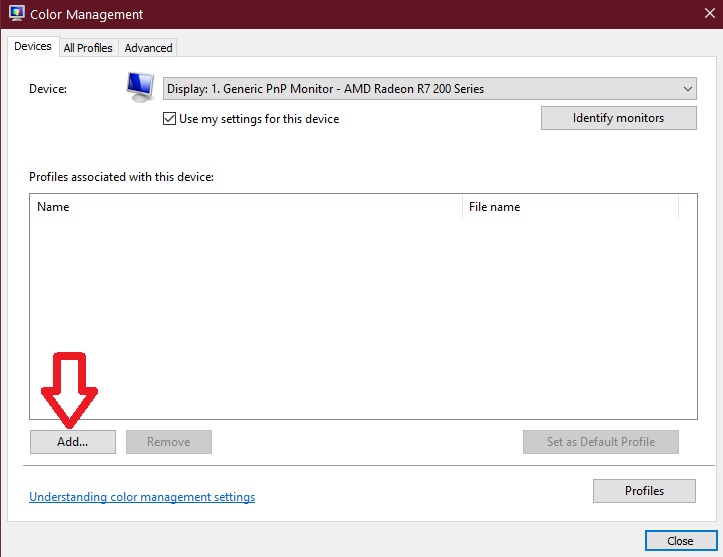
- Now, click on the ‘Add’ button from the bottom-left corner of the window and browse to the location where you have downloaded the ICC profile
- Select that and click on the ‘Add’ and ‘OK’ that will activate the ICC profile
- Now, go to the ‘Advanced’ tab and click on the ‘Change System Defaults…’ option
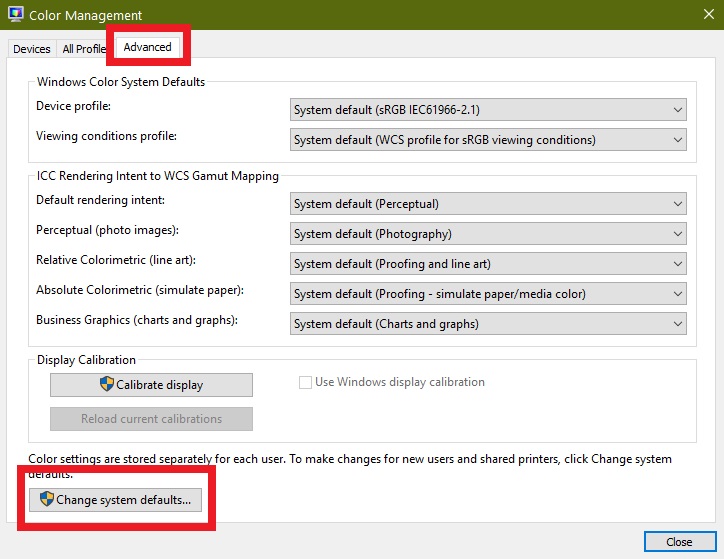
- In doing so, another similar window will pop up. Once again, go to the ‘Advanced’ tab from the new window and checkmark the box next to the option ‘Use Windows display calibration’
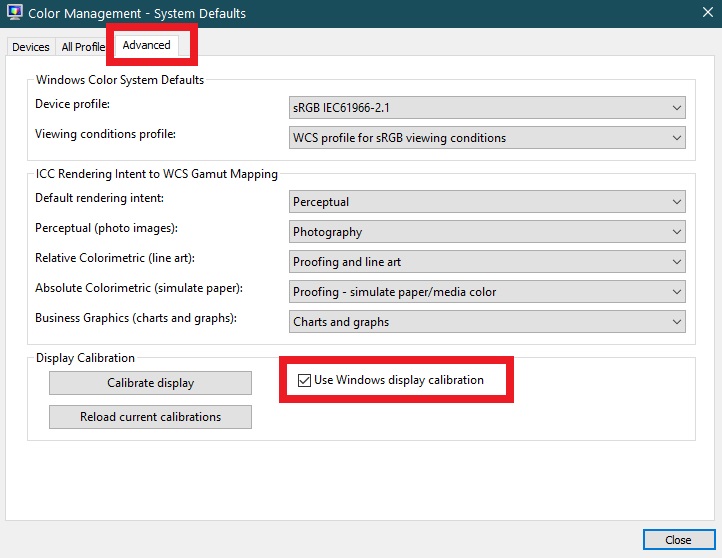
- That’s it. You can click on the ‘Close’ button to close those pop-up windows
If you have followed the above steps, your monitor will look great. However, if you use the ICC profiles provided by us, then you might have to calibrate the default display settings a bit.
Here are the settings you can try for these particular ICC profiles.
Settings for the ICC profiles:
- Splendid Mode: Standard
- Brightness: 24(you can go for more if you prefer)
- Contrast: 74
- Sharpness: change it to your liking
- Saturation: change it to your liking
- Color Temp: Red: 100; Green: 90; Blue: 89 (User Mode)
- Smart View: Disable
- Skin Tone: Natural
- Trace Free: Lower than 60 is better
- ASCR: Off
Remark: We have noticed that some particular games run on their own default graphics settings. As a result, whatever you do, the custom color profiles are not going to work on those games.
Still, if you want more customization on color, then you can try various color software. Among them, the Display Profile and Color Clutch are two of the most popular ones. So you can give them a try.
The Last Option:
So, you have tried all of these methods above, but still, you haven’t found your favorite settings? Don’t throw in the towel just yet. Because we have one last suggestion for you. And, here it is…
- Activate the ICC profiles using the specified settings at first
- Then go to the Lagom website from your PC
- This is a website for calibrating your monitor’s display settings and also to test the current settings
- So, calibrate your Asus VG248 monitor display settings using the test images there
- Also, you can use the test images to get an idea about what is going on with your current settings and calibrate accordingly
Final Lines
If you have tried the option mentioned above, then you will very likely find the best settings easily. However, if you haven’t got it yet, just tweak it for a bit more. We believe that you will figure it out after a few tries.
So, if you have an Asus VG248 monitor, these tips above will help you to bring out the best out of your monitor. If you have any other queries about the procedures above, you can let us know in the comment section.